Textiles roundabout

4/10/16
Using an embroidery hoop and a sewing machine with an embroidery foot attachment, I attempted to create the design seen on one of the gravestones stones at Darwen cemetery ‘Document the day’. I didn’t draw the design on the piece of material first although I regretted this almost immediately . I just wanted to experiment and get used to moving my hoop around the machine so the end result was just an experiment and to see what I could and couldn’t do.

I was introduced to several ways of creating surface designs. Here I used dyes and bleach and marbling.  Unfortunately I haven’t been able to do the screen printing yet but I hope to participate in that next week.

I was also introduced to the cyanotype photographic printing process or blue print process as it is otherwise known. The process uses two chemical iron compound solutions, Feric ammonium iron citrate and potassium ferricyanide . Paper or any absorbant material is coated with the solution over night and dryed in the dark. Negatives are placed on the material to make a print and uv light is used to expose the print. Once fully exposed our prints were processed by rinsing under cold water creating a cyan-blue print. This process was discovered by astronomer sir John Hershel in 1842. Sir john also gave us words such as Photography, negative, positive and snapshot. (www.alternativephotography.com/wp/processes/cyanotype/cyanotype-classic-process) 


I also experimented with my print on wallpaper, I used wax crayon and dye and using the material I had marbled and dryed earlier began to make my piece 3D  using the sewing machine drawing around the flowers and adding lots of texture. The piece isn’t completed yet but I hope to finish and post it soon.

I have hand sewn some yarn on to some of the flowers in similar colours to make the flowers 3D. The yarn adds more Texture to the piece. 


Ucas Application and my Interview.


23/02/2017

Today I had my interview with Jamie Holman for the Fine Art degree at Blackburn. Jamie has seen my work, and asked me what I hoped to learn on the course and what I want to do when the course is over. I was given a welcome pack and he said I was just the sort of student he was looking for and shook my hand.

Andy Edwards and Emma Rodgers

After watching the news on ITV a sculpture of Cilla Black was unveiled and I had to take the name’s of the sculptors involved as I thought it was Amazing.

I loved the idea behind Cilla’s dress the most, the idea of using iconic times and photographs in her life to make up the fabric patches in her 60’s dress.

Andy Edwards is a figurative sculptor , artist and precision model maker from Stoke on Trent and Graduated from Staffordshire University  in 1986. After graduating Andy spent seven years working in the special effects industries in the model making and puppety of Madame Tussauds.

Emma works in ceramic and bronze sculptures mostly in Animal sculptures capturing form, movement and Tenderness.

I will be potentially adding them to my extended bibliography in my FMP and research their work further.

Reflection Unit 5

I have taken some time to look back over the blog posts and work I have done since starting unit 5. I have managed to research artists and experiment with lots of materials that I had been introduced to on the roundabouts during units 1 to 4.

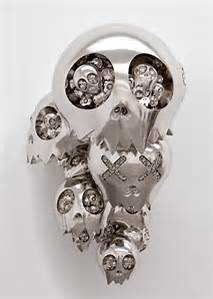
We had begun unit 4 with the brief. Inspired by.. Taking inspiration from something at the V&A museum and I had found a print from an engraving by Paul Birkenhultz (1561-1639)who was a designer and engraver in the early 1600’s. The print was simply titled Design for a pendant. It was the intricate details that made me decide on the piece. I wanted to see what the piece would look like enlarged and so I started to make some of the pieces in wire and begun with the Rabbit. Reflecting on the wire sculpture of the rabbit I have remembered how quickly it begun to take shape. Compared to the bird sculptures it was easy in comparison and it appears much simpler to look at and photograph.

The first bird that I sculpted with the wire took a bit longer than the rabbit and I used a lot more wire choosing to weave the wire to create the Form and spot welding less frequently. The beak and the Talons were the most difficult to get right.

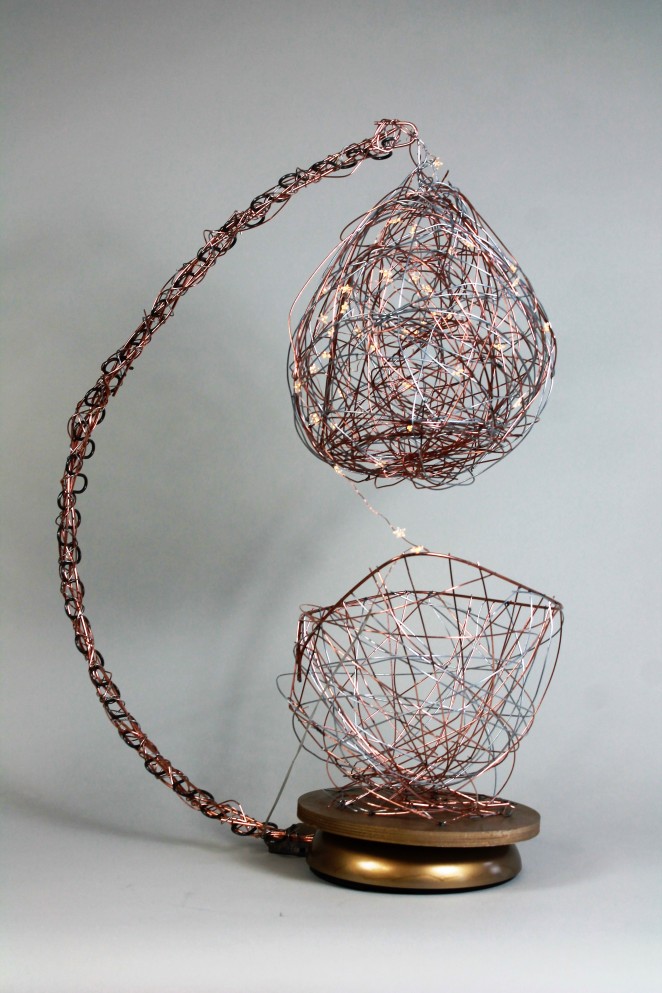
Because the Paul Berkenhultz design had symmetrical birds I had to make another one. During this time I had also begun to make a commission piece from wire that involved using copper wire as well as the wire I was using on the birds and because of the change in style while making the wire commission piece I begun to change the way I sculptured the bird. The end result of the bird became fatter and heavier than the first as I kept adding more wire and wasn’t happy with its less than symmetrical appearance to the other bird.

Its head and beak were completely different although it did still look like a bird of prey. I think if I was to have another go at making the Symmetrical birds or other sculptures I will concentrate on one structure at a time or do a little at a time on each piece so that my style doesn’t change.

At home in my spare time I concentrated on what I could do with photo shop after being inspired by  Jamie Holmans merged photographs. I also did some drawings and photo shopped them to add colour then moved onto a large scale drawing of the pendent in college. I am still getting to grips with Illustrator and Photoshop. I find it difficult as the process is slightly different on a mac than on the pc. I have come across other apps that are helpful and a little easier to use.

As I was moving on with my project I had to not only experiment with more materials but also with scale so I visited the making rooms to experiment with some laser cutting and etching.

This also involved work on their computers using Inkscape.  wp-image-860479531jpg.jpg

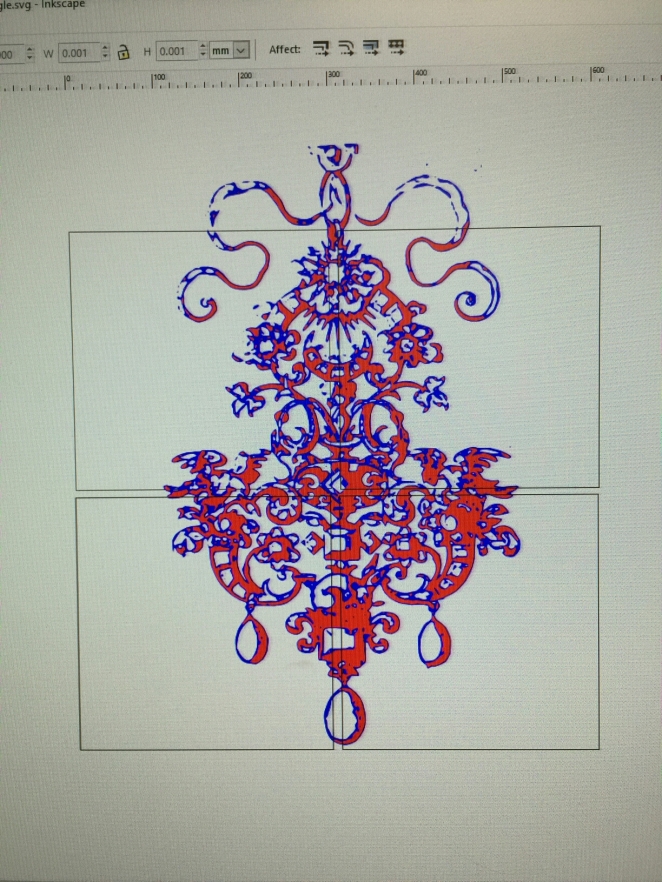
I need to decide how I would like to present the pieces as finished pieces of work but I don’t know how yet. I am thinking of making a Regal coloured velvet covered boards and displaying them like that but I am not sure yet. I might come up with something else.

Not all the laser cut work went to plan.  When I tried to laser etch into a mirror it resulted in a broken mirror and laser etched vinyl backing. I didn’t want the time I spent on it to go to waste. I experimented with embossing powders which resulted in a distressed textured metal like piece that I was quite happy with. I need to design a way for the piece to be displayed. It needs something on the back to cover the broken mirror and make it safe.

I then moved onto changing the composition of the design using all the elements and rearranging them on a lino so that it could be carved into and printed but after I put the composition together I didn’t want to carve into it. I had hoped to get the most out of it as I could.

I wanted to do a screen print as I had missed out on that when I had been doing the roundabouts and Mandy helped me to adjust the image contrast to be sent for the screen. I also hoped to take some photographs of the shadows it made on the wall in the studio before cutting into it and producing prints. Unfortunately nothing has come of this Lino and composition as yet and as we are moving onto our FMP soon it is doubtful I will get the chance which is disappointing.

As I couldn’t cut into the Lino I decided to do another one but just taking part of the design for the lino. I chose to do the top half of the design for a pendent. When I had made a Lino during units 1 to 4 I had wanted to set it in Plaster so I didn’t want to miss out on doing this again so after I finished printing I moved straight onto casting in plaster.

The ink hadn’t quite washed off so the finished piece had revealed a Purple print on the plaster and it was a happy accident. I tried to recreate it with another cast and added a wash of colours to the lino before casting again. I really didn’t like the results. 20170208_164819

I decided to experiment further and covered the plaster casting in Graphite powder and buffed with some cloth.

It turned out so much better than I expected it to. I really like how the colour that had been used before is just showing through.

Getting back to my larger piece I moved on with the other elements the Crescent moon and the sun.

I had intended on making the Crescent moon out of aluminium cans but that hadn’t gone to plan and it proved to be more difficult than I thought it would. The cans wouldn’t mould how I needed them to and I wasn’t happy with the way it was going. I then decided to make the Moon from wire and cover it in silver card using the Heat gun. The face however was a mask covered in aluminium triangles from the cans and heat glued together. Some of the aluminium pieces have a tendency to move from the face and need to be stuck back down again which is annoying but otherwise I am happy with the end result.  The sun is not completed. Each part of the sun needs to be made and put in the kiln and assembled together after. so far i have sculpted the face in clay.

I think I achieved what I set out to achieve when I started the Unit 5 Brief. I wanted to play with scale. Taking a design that is supposed to be small and making it Big even though it is not a large finished piece. I had hoped to put a narrative together but that isn’t actually communicated through the art work so on that point I failed and the narrative lives in my head.  I experimented with tools and Materials and even made a potential Commission piece at the same time and although my work wasn’t picked I followed the brief that we were given. I am quite proud of my achievements. I believe I have grown in confidence and problem solved my way to some great pieces of work and when I haven’t been happy with something I have done my best to turn things around until I am happy with the end result.

img_1747

After half term my aim is to finish everything that needs to be finished ready for assessment. If we have time.  I would like to put more photo’s together for my portfolio and find ways to present the work that I have done and that needs presenting. I also need to go through my photographs that I have taken over the last few months that show any photography skill and decide which ones would look good in my portfolio.

The sun still need the rays to be done and then the pieces to be fired and assembled and the moon still needs to be hung. If there is time I would like to finish what I set out to do with the composition lino and add a screen print to my body of work.

I also need to be prepared for my interview For the Degree.


Photographing my work for portfolio.

Before we move on to Degree we hope to each put a portfolio together of our work so that we have a catalogue to show what we have achieved in our work and look back on it as we progress. I have never done a portfolio before but we were assured we would have some help with putting one together. In order to take some really good pictures of our work we must have access to the photographic studio and a good camera unfortunately the studio wasn’t available and so a set was made up with lights and paper on tables. Molly one of the students doing Photography on fad was drafted in last minute to take some pictures.

We began with the largest  Wire sculpture that I had originally designed as a potential commission piece and took photographs from every angle possible and using varied light and camera effects. img_1750

Molly conferred with me about the positions I wanted her to take the photographs and did a very good job. I am very pleased with them.


It was a shame I didn’t get to use the photography studio as I had wanted to hang the lino piece and cast shadows like American Achititect Stephen Holl with his Zen table.

http://inventorspot.com/articles/zen_and_the_shadow_art_of_the_riddled_table_17001

I would have liked to have done this with the Lino piece and with some of the other pieces including the moon but there was a whole group of us from 3D and one camera and the Tutors were not available as they had to help with interview portfolios upstairs which I understand.


Critique 8th Feb

Every week foundation team up with the degree students to critique each others work. I love to see what my fellow students are working on as we are all so busy getting on with our own work that its easy to miss what others are doing. I was particularly interested in seeing some work by the degree students and today one of them decided to show off their work. First of all the representative showing their work has to decided just how honest they would like the critique to be and it is measured in strength of a curry. A korma is a light hearted critique a Bhuna with side of chips is a slightly tougher critique while a Vindaloo is the toughest critique you can have. (no holds barred).

The first to show his work was one of the degree students and he chosen to receive a vindaloo critique. He had taken a book he purchased by a Contemporary Photographer. The Photographs were taken of a variety of  different nude poses exposing different Gender, Age and sexual orientation and the book appeared to be vandalised. The student talked through what he had done, explaining he had started to black out sensitive material in the image portrayed and the Tutor thought it best to look at the book first. The student then went on to say that he got bored with what he was doing and was running out of time and decided to write in the corners instead. The tutor was gasping and shaking his head while looking at it and begun to ask questions that the student couldn’t answer without back tracking and confusing himself and us but what was worse is that the student wouldn’t take responsibility for what he had chosen to black out or write saying it wasn’t his words but the words of others. The tutor was not happy to let the book go around the class for fear of offending people which actually made people more inquisitive. Eventually the book was shown to us. Instead of going into to much detail about the piece of work it was not received well with the students who were critiquing. There was a lot of sexist, Ageist and negative quotes and he was the one who came under scrutiny instead of the work. It wasn’t that he had destroyed the book as much as him not taking the responsibility for what he had written and not understanding that people don’t see things the way he can see it in his head. We can only see what he has done and written and that’s why he has caused offense.

It was a heated critique and one that was talked about for days after.

We were then shown two more fad students work. One student who hadn’t really done very much but was given the right advice to take him on further and another who had taken some really lovely photographs and done a lot of work around confessions and we struggled to critique her because her work was so good.

Today was the first time I really saw the benefit of these critiques. I learnt how important it is to have a good concept and a good understanding of what you are trying to achieve in your work. I learnt how not to expect everyone to understand your views and agree with them and to always take responsibility for what you do. To listen to advice good or bad and own it and learn from it.


Exhibiting my work for Sale.

We were all asked to exhibit our work for the potential commission piece.  Some students only had a Maquette to show off their design concepts and there were a lot to choose from. It  was really quite scary and we were all feeling the nerves. I was really nervous knowing I had to talk about my work.


The Lady was greeted at the entrance by the Tutors and they had a chat before she was shown upstairs to look at the work exhibited. We were then asked to come and stand by our work and talk about it. We brought other pieces of work to show off to her as well as Kim thought she may be interested in other pieces. I was profusely perspiring by then.  First I talked about the laser etched piece and Kim my tutor thought she might be interested in the piece with some special framing. I then talked about my wire bird and Rabbit and explained I was just showing my skills of what could potentially be made if she was interested in the wire pieces and then we moved onto the sculpture I designed for the brief. I explained that I had designed the piece around using the most of the space in her unit that was in the brief. The Gentleman with her asked more questions and asked me if the battery pack could be moved or hidden somehow and if more lights could be added to the piece down the spine and around the bowl bottom and I said they could be added no problem, also adding that the lights could be changed for a mains plug option if they would prefer.

I didn’t win the commission with the lady I designed the piece for, she chose a piece by one of the second year degree students. Who had been influenced by an artist she was interested in.

Her piece was a highly finished piece of work. It was beautiful and If I have to be honest I had a feeling as soon as I saw it that she would win.

I have however been told that the gentleman who had accompanied her was her father and he loved my piece and wanted to purchase it for himself with the added lights and the battery packed moved. He will be in contact with one of my Tutors soon. So I now have to decide how much I want to sell my piece for.

I have no idea how to cost the piece of work. I know it has taken me at least 30 hours to make but I don’t want to price the piece to high that he changes his mind or is disappointed but I also don’t want to price the work lower than I think its worth. I have asked my Tutor and two other members of staff at college. so they think somewhere between £150 and £350. I think that If I was to look at it in a shop with handmade designs  I would probably expect to see a price tag around £280-£320 but I don’t know if I can really ask for that much. I guess its something I need to think more on and learn from. Hopefully keeping a record of time spent on my work in future will help me to cost my work and help prove of its worth but proving difficult because I am letting my heart rule my head. I love the piece of work and I am really pleased with how it turned out. Its a one of a kind, totally my design and creation and I haven’t made anything like it before. I have put my all into making it, blood, sweat, tears and sleepless nights poured into it. I wasn’t really as disappointed that the person I made it for didn’t want it.  Some people would think I would be glad to see the back of it but I am not. I know I have to think  Logically about it as I haven’t anywhere for it to go if I don’t sell it.

I decided to seek some further advice from friends and posted it onto my Facebook page.

facebook-feedback-friends

facebook-capture-friends

capture-fb-friends

I even searched for help via google and came across this Handbook for teachers.

Cost/ Value. Try selecting contrasting sculptures and look at:  The cost of the materials  The (sentimental) value to the owner  Does age enhance the value?  Why?   The selling price by the artist  The selling price by the gallery (usually the artist’s price + 50% or more)  The value to someone who loved/ hated it  The value if it were made by someone famous  The value if it is an original piece or a copy/ fake  The value if it is one of an edition of 10, 50, 500….  http://www.discoveryzone.org.uk/sculpture%20handbook.pdf (08/02/17)

I don’t know how much the Gentleman is willing to pay but I feel that if the price I suggest is to high for him then maybe he can make an offer or I will sell it at a later date to someone else who is prepared to pay what I think its worth.

Commission piece update.

Today I am having to go back to square one with using the Ikea base to mount the spine of the commission piece. Unfortunately after some research and talks by my Tutor Jamie there is concern with the amount of lead that would need to be used in the piece and the harm it may cause over time.  This isn’t something that can be taken lightly and so we have decided lead is not going to be used in the piece.

lead powderLead is a naturally occurring metal but its natural status doesn’t mean it’s healthy. In fact, lead is extremely toxic to humans and affects the liver, kidneys, reproductive system, and nervous system. [1] Lead exposure can happen quietly and causes permanent problems, especially to the brain. Children are the most at-risk for lead exposure and the worst effects impact motor skills and cognitive impairment. Toxic metal and lead poisoning is a problem in many countries in the world including the United States, Iran, India, and China. Sources of lead exposure really vary which is due in part to the inclusion of lead in many chemicals and products. Occupational exposure is a public health issue everywhere and mine workers, paint factory employees, drivers, and tile makers are just a few occupations that have been identified as higher risk for lead toxicity. [2]

http://www.globalhealingcenter.com/natural-health/toxic-metal-health-dangers-lead/ (06/02/16)

We have set the spine back in the base using the epoxy resin   I twisted in the LED lights to the bulb part of the sculpture and I love the way they look.  I have sprayed the Ikea metal top for the Base in gold and we have measured and put a hole in the middle of the wooden basket base ready to fix to the base and the wire sculptured basket.  I have sprayed the battery box so that it blends into the sculpture as much as possible.

Moving on I still need to spray the spine of the piece and find a way to counter balance the spine and bulb so that it stays in position and doesn’t sway and fix the metal and wooden base with basket fixed on to the base.

After waiting for the Resin to set we attached the sprayed base and the wooden top for the basket to be attached to and then attached the basket with staples. I then attached the bulb part to the spine and was so happy to find that it didn’t sway to the side like it did the first time we tried to use the base. The battery case fits just nicely behind the wire basket in a piece of wire. I cut and bent to wire that were sticking out at the top of the piece and then bent some more wire around the top to finish it.

Although my initial idea was of a vase like structure I am pleased I went off course and decided to go with my heart and let the sculpture take on a form of its own. I am really happy with it, I think it will fit nicely in the space it needs to fit in but I won’t know if the piece will be chosen until tomorrow. If it is then great and if it doesn’t it will look lovely in my house.

Researching artists and materials for Final major project ideas.

I am interested in finding out more about materials that have been successfully used to create sculptural pieces. I decided to look if bubble-gum had been used before as I was walking to my car today and seeing it on the pavement around Blackburn cathedral.

Maurizio Savini makes sculptures from chewed bubblegum and manipulates and sculpts it  while its warm with a knife like traditional materials such as clay.

“The most important step is the fixing of the sculptures with formaldehyde and antibiotic.”

http://www.telegraph.co.uk/news/newstopics/howaboutthat/4246750/Artist-creates-life-size-sculptures-using-chewed-bubblegum.html (03/02/16)

chewing-gum-sculpture

I have been thinking of making sculptures out of photographs for my FMP after seeing the Cilla black sculpture by Emma Rodgers and Andy Edwards and learning that Cilla’s 60’s dress was made up of memorable photographs. While researching I came across Oliver Herrig who is an experimental artist and has used Photo sculpture.  Herring starts with a polystyrene base and pastes thousands of cut up photographs to the base. “Gloria”, one of his most famous sculptures, is of a girl leaning against a wall in a colorful flower dress holding her necklace. Herring took pictures from every angle of her and he cut and pasted them on the base to form the sculpture.

https://en.wikipedia.org/wiki/Oliver_Herring (06/02/16)

Image result for oliver herrig

A photo-sculpture is the reproduction of persons, animals, and things, in 3-dimensions by taking a series of photos in the round and using them as synchronized photo projections to create a sculpture.[1] The process was invented and patented by French artist (painter, sculptor and photographer) François Willème in 1860. He took a series of photographs from around a subject and used them to carve a likeness of the figure.[2] Contemporary photo sculptures are obtained through a process of 3D scanning and 3D printing. The results are small statues that represent the portrayed entity.

Examples of photographic sculptures include the work of experimental artist Oliver Herring.

https://en.wikipedia.org/wiki/Photo_sculpture (06/02/16)

I have been thinking of creating a life size 3D sculpture of my identical Twins embracing using wire. Possibly in cube style form on identical sized boxes to start with then wire cubes and wire drawings like my birds and fixing the photographs to them to make a sculpture inspired by Oliver Herring.

I have had a quick chat with my Tutor and she told me to look at David Hockney/ Hockney joinery and cubism. Which has also lead me to look at Maurizio Galimberti which I will explore further.

Image result for David Hockney Cubism

Maurizio Galimberti.

Image result for maurizio galimberti,

Crescent moon and Sunburst.

I decided to experiment with some other materials for the large scale pendant pieces so I made a start on my moon with Aluminium cans carefully cutting the bottoms tops and sides as they are very sharp. I then took some florists wire to hold the together and attempted to turn the bottoms and tops of the cans into a crescent moon shape.

I took a paper face mask and covered it in cut pieces of the can.

I made a crescent moon shape out of wire to help me shape the can ends but they were to resilient to shaping and I didn’t like how they looked so I scrapped that idea and decided to use a silver backed paper and covered the wire frame using a glue gun. To fix the mask to the Moon I had to stick the same paper to the inside of the mask and leaving half of it to over lap and stick to the moon. I then used the same effect as I used to cover the moon in the silver backed card to frame around the face. Unfortunately as I was doing this one of the Blue eyes fell in to the mask and although I did try to fix it back in it didn’t look right again so I pushed the other eye in to match.Although I did like the Face when it was a mask to have the blue eyes I didn’t think I needed them to complete the Moon as the reflection from the silver backed paper was enough to add an expression that I liked. In some lights it appears to have his eyes shut or winking.

I have to decide now how I want to display the piece it doesn’t sit or lie down well and I like the shadow it leaves on the wall so I think I would prefer to hang it.

I have been researching renowned sculptors and taking influence from Takashi Murakami https://kristysimpson2016ualfad.wordpress.com/2017/01/11/sculpture/

thhvotajtd

I like how he shows character in his pieces and I have tried to achieve that with my moon character and I hope to do the same with the sunburst.

Moving on I need to make my Sun to finish all the elements in the pendant.

I am deliberating the best way to achieve this. I am thinking about creating the shape from wire and then covering in multiple fabric’s with varied colour, pattern and texture or possibly making it in clay.

I decided I would like to make the Sunburst from clay and sculpt an androgynous face in to it much like what you would see on a tarot card or in Alchemy.

I have chosen to use Terracotta clay

as its a warm orange colour anyway which is perfect for a sun. As the clay was all over my hands I kept forgetting to take pictures of development in between. The kiln is not very big so I am doing the face first and then the rays from the sun will be put in the kiln separately and attached afterwards. This is my sun face so far.